Install Natsura (Package Method)
Before you start
This is a Windows-only, step-by-step guide for installing Natsura by hand using Houdini’s package system. It produces the same result as answering Yes to the package prompt in Installation; you're just writing the package file yourself.
For which Houdini versions each Natsura build supports, see Requirements.
Natsura supports Houdini 20.5 and Houdini 21.0. This guide uses 20.5 in all example paths. If you are installing for Houdini 21.0, replace every houdini20.5 with houdini21.0 and every 20.5 with 21.0 throughout.
You should be able to say "yes" to all of these:
- You’re on Windows 10 or 11
- You have the SideFX Houdini Launcher installed
- You have Houdini 20.5 or 21.0 – Python 3.11 (production build) installed from the SideFX launcher
- Houdini starts without license errors
Step 1 – Install Houdini 20.5 or 21.0 (Python 3.11)
- Open the SideFX Houdini Launcher.
- Install Houdini 20.5 – Python 3.11 or Houdini 21.0 – Python 3.11 (production build).
Step 2 – Run Houdini once
- In the SideFX launcher, start Houdini 20.5 or 21.0 – Python 3.11.
- Confirm:
- Houdini opens.
- No license error windows appear.
- Close Houdini.
This creates the folder:
C:/Users/yourwindowsusername/Documents/houdini20.5/
If your name is aHamerRocks, the path should look like this:
C:/Users/aHamerRocks/Documents/houdini20.5/
Step 3 – Download and unzip Natsura
- Go to https://natsura.com.
- Log in / create an account.
- Download the latest Natsura build for Windows (ZIP).
- In File Explorer, create this folder:
C:/Users/yourwindowsusername/Documents/natsura
- Unzip the Natsura ZIP into that folder.
You should now have:
C:/Users/yourwindowsusername/Documents/natsura/houdini20.5/
C:/Users/yourwindowsusername/Documents/natsura/houdini20.5_UI/   (optional)
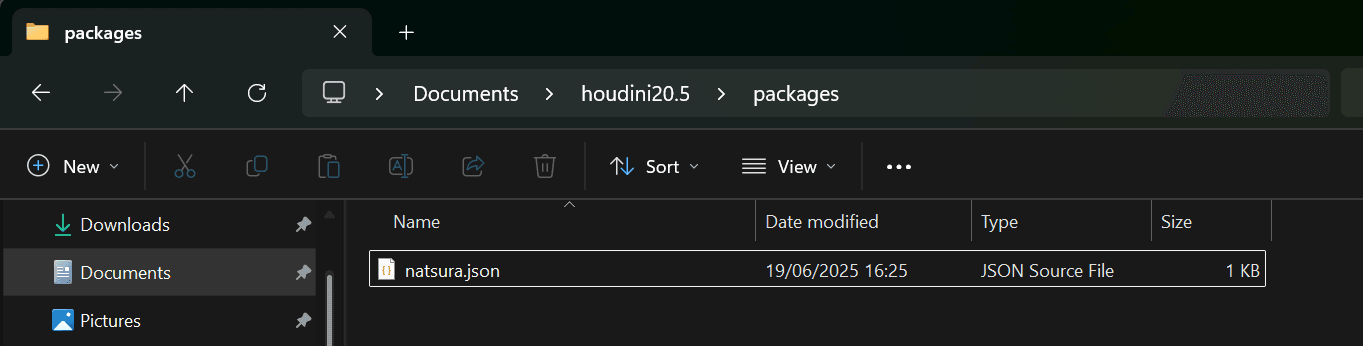
Example on Windows (what it should look like):

C:/Program Files/..., Network drives, Aggressive cloud-sync foldersStep 4 – Open the Houdini preferences folder
In File Explorer, go to:
C:/Users/yourwindowsusername/Documents/houdini20.5/
You’ll put the Natsura package file in here (next step).
Step 5 – Create the packages folder
Inside:
C:/Users/yourwindowsusername/Documents/houdini20.5/
you must have a folder named packages.
If it doesn’t exist, create it:
C:/Users/yourwindowsusername/Documents/houdini20.5/packages/
packages. Lowercase, no spaces, no extra characters.Step 6 – Create natsura.json
Now you tell Houdini where Natsura lives.
- Open:
C:/Users/yourwindowsusername/Documents/houdini20.5/packages/ - Right-click → New → Text Document.
- Name it exactly:
natsura.json
(notnatsura.json.txt– enable file extensions if needed). - Open
natsura.jsonin your text editor. - Paste the block that matches your Houdini version:
Houdini 20.5:
{
  "path": ["$NATSURA", "$NATSURA_UI"],

  "load_package_once": true,
  "enable": true,
  "version": "20.5",

  "env": [
    {
      "NATSURA_ROOT": "C:/Users/yourwindowsusername/Documents/natsura"
    },
    {
      "NATSURA": "$NATSURA_ROOT/houdini20.5"
    },
    {
      "NATSURA_UI": "$NATSURA_ROOT/houdini20.5_UI"
    }
  ]
}
Houdini 21.0:
{
  "path": ["$NATSURA", "$NATSURA_UI"],

  "load_package_once": true,
  "enable": true,
  "version": "21.0",

  "env": [
    {
      "NATSURA_ROOT": "C:/Users/yourwindowsusername/Documents/natsura"
    },
    {
      "NATSURA": "$NATSURA_ROOT/houdini21.0"
    },
    {
      "NATSURA_UI": "$NATSURA_ROOT/houdini21.0_UI"
    }
  ]
}
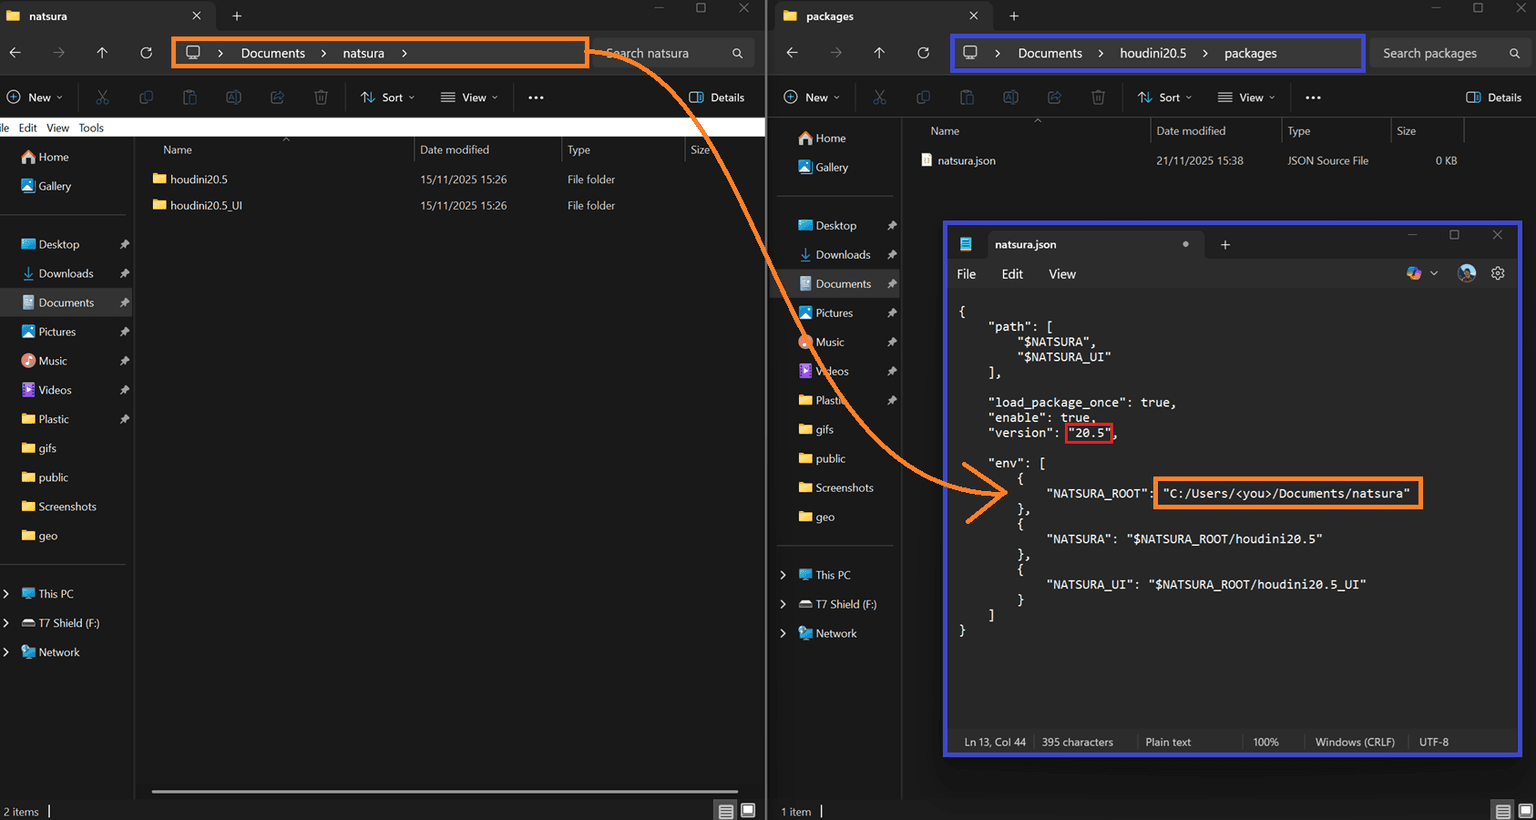
Screenshot example of the correct place:
- In File Explorer, go to the Natsura folder:
C:/Users/yourwindowsusername/Documents/natsura - Click once on the address bar at the top.
It becomes plain text like:C:\Users\yourwindowsusername\Documents\natsura - Press Ctrl + C to copy it.
- In
natsura.json, replace theNATSURA_ROOTline with the correct path:"NATSURA_ROOT: C:\Users\yourwindowsusername\Documents\natsura" - now, you must change the slashes from
\to/
"NATSURA_ROOT": "C:/Users/yourwindowsusername/Documents/natsura"
/. Do not leave any backslashes \ in the JSON path.If you don’t want the extra Natsura UI:
- Remove
"$NATSURA_UI"from"path". - Remove the
NATSURA_UIblock from"env".
Save the file as natsura.json.
Step 7 – Start Houdini and check Natsura
Now we do the first and only check.
- Start Houdini 20.5 or 21.0 – Python 3.11.
- Watch the startup:
- No license errors.
- No Python/Qt errors mentioning Natsura.
- When Houdini is open, it should look similar to:
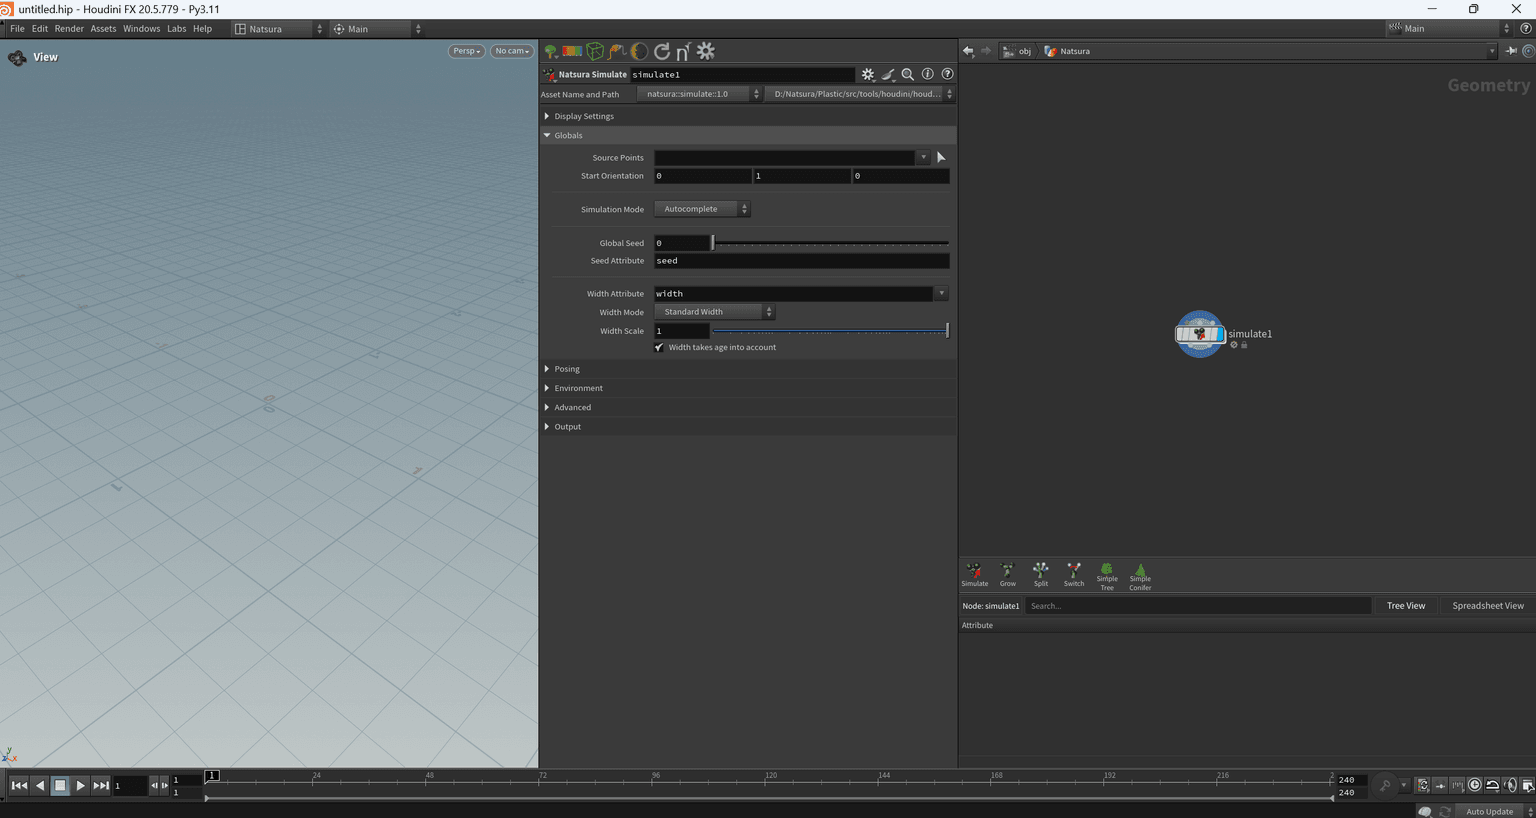
You’re done if:
- Title bar says Houdini 20.5.x – Py3.11 or Houdini 21.0.x – Py3.11.
- You see a Natsura menu / shelf.
- The Simulate node works without Python/Qt errors.
Your folders and file should look like:
The first time Natsura runs, it will ask for your Natsura license key:
- Go to https://natsura.com.
- Open your dashboard.
- Paste your license key into the prompt in Houdini.
If Natsura does not appear, go to Troubleshooting.
Troubleshooting
Houdini creates this when it runs.
- Open the SideFX Houdini Launcher.
- Start Houdini 20.5 or 21.0 – Python 3.11.
- Close Houdini cleanly.
- Check again:
C:/Users/yourwindowsusername/Documents/houdini20.5/
# or for Houdini 21.0:
C:/Users/yourwindowsusername/Documents/houdini21.0/
If it still doesn't exist, you're probably not launching the right version with Py3.11.
Check these in order:
- Houdini version:
- Must be Houdini 20.5 or 21.0 – Python 3.11 (not Py3.10).
- Package file location:
natsura.jsonmust be exactly here:C:/Users/yourwindowsusername/Documents/houdini20.5/packages/natsura.json
- Paths inside
natsura.json:NATSURA_ROOTmust point to the folder that containshoudini20.5/:C:/Users/yourwindowsusername/Documents/natsura/houdini20.5/
- Check Houdini's package report:
- In Houdini: Help → About Houdini → Show Details → Packages
- Find
natsura.json enableshould betrueand there should be no Natsura errors. :::
You likely pasted Windows-style backslashes directly into JSON.
What you copied:
C:\Users\yourwindowsusername\Documents\natsura
What JSON must contain:
"NATSURA_ROOT": "C:/Users/yourwindowsusername/Documents/natsura"
Fix:
- Replace all
\with/. - Make sure there are no backslashes left.
- Save
natsura.json. - Restart Houdini. :::
- Confirm you launched Houdini 20.5 or 21.0 – Python 3.11.
- Temporarily disable other Houdini packages:
- Move other
.jsonfiles out ofpackages/.
- Move other
- Start Houdini with only
natsura.jsonpresent. - If errors disappear, another package is conflicting. :::
- Remove
"$NATSURA_UI"from"path". - Remove the
NATSURA_UIblock from"env".
Save the file as natsura.json.
- Delete or rename:
C:/Users/yourwindowsusername/Documents/houdini20.5/packages/natsura.json - (Optional) Delete the Natsura folder:
C:/Users/yourwindowsusername/Documents/natsura/
Email support@natsura.com with:
- Your Windows version (10 or 11)
- Your full Houdini version
- The full content of your
natsura.json - Any errors from:
- The Houdini console
- Houdini log files
- Help → About Houdini → Show Details → Packages :::
Installation
What it means to install Natsura into Houdini, the two ways to do it, and why Natsura's setup defaults to a separate standalone launch rather than loading into your everyday Houdini.
Upgrading
How to move Natsura to a new version, and what to do when a scene built in an older version needs bringing up to date.